Hey guys, I hope you are doing great!
Today I’m going to show you how to setup free & auto-renewing SSL certificates for WordPress websites that are hosted on Google Cloud Platform compute engine.
Before start this tutorial, you should know about these tutorials:
- Install Linux, Apache, MySQL, PHP on Ubuntu 18.04
- Install Apache, MySQL and PHP on Ubuntu 16.04
- Install phpMyAdmin on Ubuntu 16.04
We will follow these steps
- Connect to Google Cloud Compute Engine via SSH
- Install Certbot Client
- Generate SSL Certificates
- Certificate Auto-Renewal Setup
- Setup SSL Certificates
- Set Auto Redirect to HTTPS (optional)
- Enable SSL and Restart Apache
1. Connect to Google Cloud Compute Engine via SSH
- Login to your google cloud console : https://console.cloud.google.com
- Select your project from top projects dropdown or create new project
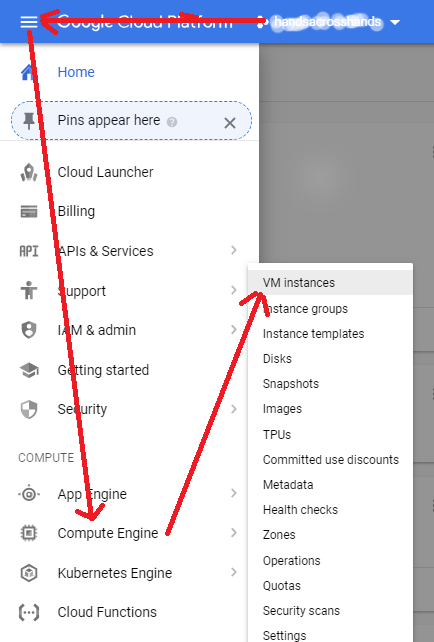
- Go through left navigation > compute engine > vm instances
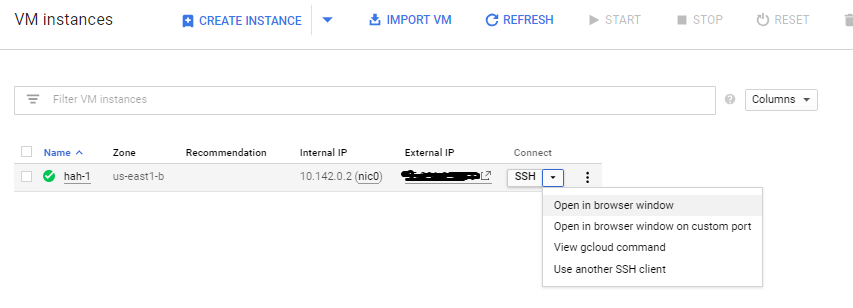
- Now you can see ‘SSH’ with dropdown icon at the end of vm instances row
- Go through ‘SSH’ dropdown > open in browser window . This will open SSH window in new tab
- You can connect to vm instance using linux terminal or windows putty using ssh key for vm instance
2. Install CertBot Client
Certbot client is used to issue the SSL certificates that we will use to setup SSL. Use below command to install CertBot. First move to root directory using command cd / . So that certbot-auto package can be accessed from root folder.
wget https://dl.eff.org/certbot-auto && chmod a+x certbot-auto
3. Generate SSL Certificates
Now we will use Certbot client to create SSL certificates for our domain. Execute below command to do this:
/certbot-auto certonly --webroot -w /var/www/html/ -d 100utils.com -d www.100utils.com
In above command I have used my domain ‘100utils.com’. So in your case you need to replace it with your domain name. After executing this command, certificates will be generated and at the end you will see the certificate path like below:
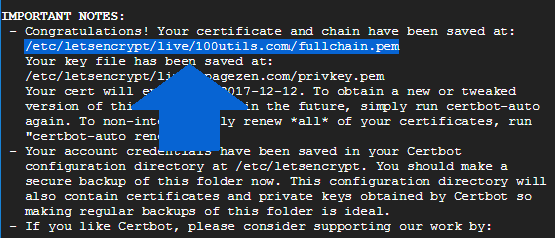
Please note down this path. This will be used later.
4. Certificate Auto-Renewal Setup
before auto-renewal setup, lets test for certificate renewal. Use below command to renew certificate:
/certbot-auto renew --dry-run
If this goes success, you will see message ‘Congratulations, all renewals succeeded’. This means certificates are renewing properly.
Now lets setup auto-renewals.
Here we are going to setup cron using crontab that will automatically renew the SSL certificates before they expire. Use below command to setup cron :
sudo crontab -e
This will list available editors and you need to select any one like below:
1. /bin/nano
2. /usr/bin/vim.basic
3. /usr/bin/vim.tiny
In my case I choose option 1.
This will open crontab file in edit mode. Now add these 2 lines at the bottom of crontab file:
0 0 * * * /certbot-auto renew --quiet --no-self-upgrade
0 12 * * * /certbot-auto renew --quiet --no-self-upgrade
Now press ctrl+o to save file and then ctrl+x to exit the editor.
5. Setup SSL Certificates
There should be apache ssl config file like default-ssl.conf inside /etc/apache2/sites-available/ directory. Execute below command to open ssl config file :
sudo nano /etc/apache2/sites-available/default-ssl.conf
Add below code in ssl config file :
<Directory /var/www/html/>
   Options Indexes FollowSymLinks MultiViews
   AllowOverride All
   Order allow,deny
   allow from all
</Directory>
Like below image :
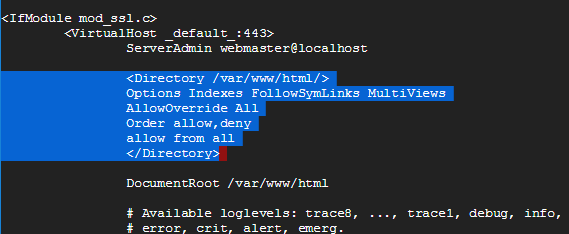
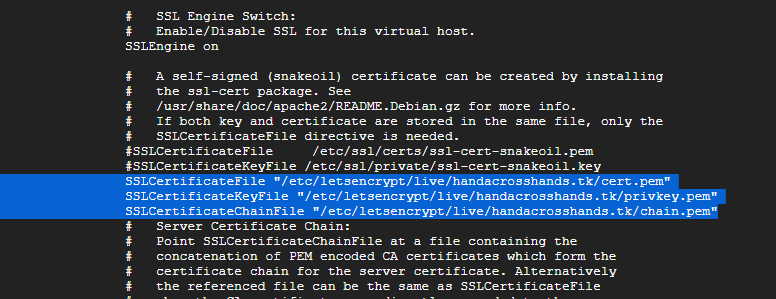
Now scroll down on this ssl config file and you will see there are already certificate files are added. Just comment them ( add # next to existing certificate files). Now paste below code (certificates):
SSLCertificateFile "/etc/letsencrypt/live/100utils.com/cert.pem"
SSLCertificateKeyFile "/etc/letsencrypt/live/100utils.com/privkey.pem"
SSLCertificateChainFile "/etc/letsencrypt/live/100utils.com/chain.pem"
Like this image:
6. Set Auto Redirect to HTTPS
Its not compulsory step. But if you want to force fully move all your traffic to https, then follow this step. To move all traffics to https, we can do using apache config file or we can do using .htaccess
using .htaccess :
RewriteEngine On
RewriteCond %{HTTPS} !=on
RewriteRule ^(.*)$ https://%{HTTP_HOST}%{REQUEST_URI} [L,R=301]
using apache config file :
execute below command to open apache config file in edit mode:
sudo nano /etc/apache2/sites-available/000-default.conf
add below code to apache config file:
ServerName www.100utils.com
ServerAlias 100utils.com
Redirect permanent / https://www.100utils.com/
Note: Replace 100utils.com with your domian
Press ctrl+o to save file and then ctrl+x to exit the editor.
7. Enable SSL and Restart Apache
In order to take effect all these changes, execute below 3 commands:
sudo a2ensite default-ssl

sudo a2enmod ssl

sudo service apache2 restart
Now all is done. Now enter your domain in address bar with https. And it will work fine. If its now working, heck your configuration here www.ssllabs.com/ssltest/

